Tuesday, October 27, 2015

3 Ways to Transfer Photos from iPhone to Android like Galaxy S9/Note 9

You've taken tons of photos with your iPhone and now you are planning to make a switch to Android - say, from iPhone to Samsung Galaxy S9/S9+ or Note 9. You certainly don't want to lose the pictures when you make the move to Android. Sending a bunch of pictures from iPhone to Android, however, can be a bit trickier. In this blog, we'll show you several simple ways to transfer photos from iPhone to Android.

Method 1: Drag and Drop

The easiest way to transfer your photos is to simply drag and drop the images from iPhone's default photo directory/folder to Android's image folder. For this method, you will need a Windows PC and the USB cables for both your iPhone and Android.
  1. Connect both your iPhone and Android phone to your PC via USB cables.
  2. On your Windows PC, open My Computer. You should be able to see two new drives or entries under Portable Devices.
  3. From the iPhone's storage, locate the DCIM folder and find your photos.
  4. Select the photos you want to transfer and drag them onto your Android images folder.

Method 2: Via Google+

It has become very common for people to exchange photos over a favorite IM client, such as, Google+ app. With Google+, you can have pictures on your iPhone backed up to your Google account and then saved to your new Android phone.
  1. Locate the Google+ app on your iPhone and launch it. Then sign in to your Google account.
  2. Tap Turn on Auto Backup on the Back up your photos page. Tap Yes when prompted to backup your exiting photos and videos.
  3. On your Android phone, open the Google+ app and sign in with the same account.
  4. Your iPhone photos will be in your Photos section on Google+ for Android, or in the Auto Backup folder in the Gallery Android app.

Method 3: Use Phone Data Transfer

FoneGeek Mobile Data Transfer is a professional phone data transfer tool designed to transfer data between Android and iOS devices. It can not only move photos from iPhone Camera Roll, but also pictures from iPhone library to Android phone with no quality loss.

 Download FoneGeek Phone Transfer Win    Download FoneGeek Phone Transfer Mac
  1. Download and install the iPhone to Android Transfer tool on your computer. Then open the program and run it. In the primary window, click on Phone to Phone Transfer
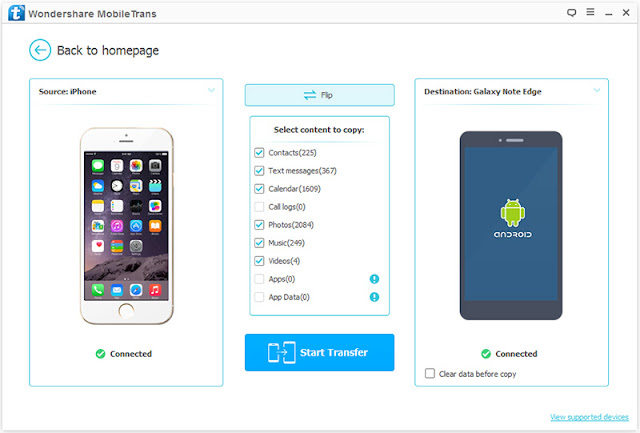
  2. Connect your iPhone as Source phone to the program and then your Android phone as Destination phone via USB cables.
  3. Check Photos in the listed file types and tap Start Transfer. It will begin moving photos immediately.
  4. After a while, you will be informed the transfer process completed. Now you can enjoy iPhone photos on your Android.

Tuesday, October 20, 2015

How to Transfer Calendar from iPhone to Android like Galaxy S9/Note 9

If you just recently switched from iPhone to Android, like the hottest Galaxy S9/S9+ or Note 9, you're not only want to transfer contacts, messages, photos, videos and music from your old iPhone 6/7/8/X to Android. Like most of us who rely much on the Calendar app to keep track of your routine, meetings and events, then you'd most likely want to move iPhone calendar to Android. In this blog, I'll show you two simple ways to transfer calendar from iPhone to Android, such as Galaxy S9/Note 9 etc.


Way 1: Sync iPhone Calendar with Android via Google Account

If you only have a few calendar entries, you can transfer iPhone calendar entries individually to Google account. This method doesn't require any iCloud account. You only need your Google account, your iPhone, and your Android phone.
  1. On your old iPhone, go to Settings app and select Mail, Contacts, Calendars.
  2. If you have Google account set up on iPhone, simple select Google or Gmail account and enables Calendar. If not, select Add Account > Google and enter your Google account details. During the setup process, make sure Calendars switch is on. When asked, select to keep local calendars on your iPhone instead of deleting.
  3. On the iPhone, launch the Calendar app. Tap on the event that you want to transfer and you'd see the details. On the menu, tap on Calendar > Google or Gmail account. Now your iPhone calendar is saved to your Google account.
  4. On your new Android, go to Settings > Account and log into the same Google account, then you will be able to see that iPhone calendar events.

Way 2: Transfer iPhone Calendar to Android with Mobile Transfer

If you have a lot of appointments, manual transfer is definitely tedious and time consuming. With a third-party data transfer tool, FoneGeek Phone Data Transfer recommended here, you are able to sync calendar from iPhone to Android in one click.

 Download FoneGeek Phone Transfer Win    Download FoneGeek Phone Transfer Mac
  1. Download the iPhone to Android Transfer tool and install it on your computer. Once the installation is done, launch it. In the primary window, click Phone to Phone Transfer.
  2. Use USB cables to connect both your old iPhone and new Android to the computer. Make sure the Android phone connected as Destination.
  3. Check Calendar in the source iPhone panel, and click Start Transfer to transfer calendar from iPhone to Android.

How to Transfer Photos and Videos from Android to iPhone XS/XS Max/XR

If you'e an Android users thinking about switching to iPhone, like the latest iPhone XS/XS Max or iPhone XR, you may be concerned about the valuable photos and videos on your old device. Take it easy. There are a couple of simple ways of transferring photos and videos from Android to iPhone. We'll outline them below.

Method 1: Move Photos from Android to iPhone Using Computer with iTunes

This method involves using a computer with iTunes. You need only to find the photos and videos on your Android phone, move them to your computer, sync them to iTunes, and then sync your new iPhone XS/XS Max/XR with iTunes.
  1. Connect your old Android phone to your PC or Mac. Choose the photos and videos you want to move, and drag them to a folder on your computer.
  2. Plug in your new iPhone 6s to your PC or Mac, open iTunes, and click your iPhone.
  3. Click Photos, check Sync Photos and Include Photos, then choose the folder where you saved your photos and videos.
  4. Finally click Apply, the photos and videos will sync to your iPhone XS/XS Max/XR.

Method 2: Transfer Photos from Android to iPhone Using Move to iOS App

Transferring your photos and videos from your old Android phone to your new iPhone XS/XS Max/XR is easier than ever with the Move to iOS, a free Android app developed by Apple.
  1. Set up your new iPhone as normal until reach the screen titled Apps & Data, select the Move Data from Android option. Then tap Continue in the screen of Move from Android, a ten-digit code will appear.
  2. On your old Android, download and install Move to iOS app, then open it. Read the terms and conditions that appear and tap Agree. Tap Next in the screen of Find Your Code, then enter the code displayed on the iPhone.
  3. Now the Android phone will connect with iPhone over a Wi-Fi Direct connection. On the Android, select Camera Roll and tap Next, the app will transfer photos and videos to iPhone.
  4. When the transfer is complete, you will find your Android photos and videos in your iPhone's Camera Roll. Finally, tap Done on Android and Continue Setting Up iPhone on iPhone.

Method 3: Copy Photos from Android to iPhone Using Phone Transfer Tool

If you are looking for a fast and efficient transfer solution, you should not miss FoneGeek Phone to Phone Transfer. It allows you to transfer photos and videos from Android to iPhone XS/XS Max/XR in one click.

 Download FoneGeek Phone Transfer Win    Download FoneGeek Phone Transfer Mac
  1. Download the Android to iPhone Transfer tool on your computer and follow the on-screen instructions to install it. 
  2. Run the program and click Phone to Phone Transfer, then connect both your old Android and new iPhone 6s to the PC via USB cables.
  3. The software will detect the two devices automatically, click Flip to set the new iPhone as Destination.
  4. Now mark the Photos and Videos in the listed file types, then click Start Transfer to begin transfer.